ZEBRA PATTERNS
 

I try to make my life less complicated when decorating cakes.  Although I love using brush for painting, making a little mistake can take a while to repair.  When trying to paint zebra patterns over white fondant it can get even measier. So here is a quick and easy wait to get perfect zebra patterns on fondant.

All you need is:
  • White fondant
  • Dark fondant (chocolate in this picture)

For instructions please click HERE


The little mermaid cake was a hit at this 7th birthday party!!  All the girls wanted to eat Ariel’s flower and the boys wanted to eat the eyes… yes, that’s kids nature :). This time, I stayed away from the typical chocolate cake and ventured with a “peaches and cream” cake. A regular sour cream cake with pieces of peaches and filled with pastry filling (similar to whipped cream) with peach pieces as well in order to stay in the same flavor subject. The cake was then covered in butter cream using the star tip method.  It was a hit with both children and adults alike!


You will need:
  • Brown Fondant
  • Gel colors (brown or black for the nose and eyes)
  • Spaghetti (to support the head of the bear, and if you like, the limbs as well)
  • Toothpick
  • One piping tip (any size)

To see full post please click HERE.

Ok, I was browsing the web and I found this. I’m really curious how this works and how useful it will be. I guess I have to wait until they post any videos, but here is the information and the link to the product.

Online-only preview April 12, HSN Network Premiere April 14

From the people who brought you the Gypsy and turned the world of scrapbooking on its head, comes the Cricut Cake Personal Electronic Cutter. Launching exclusively at HSN, this design system is specifically for decorating cakes, cupcakes, cookies and confections – making crafting sweeter than ever!

Similar to existing Cricut machines, the Cricut Cake is made with stainless steel for easy cleaning and safe for use with food. It is also compatible with existing Cricut cartridges.

http://www.hsn.com/cricut-cake-personal-electronic-cutter_at-5049_xa.aspx?rid=1761x

CIMG2838
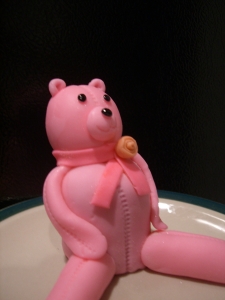
I enjoyed making this pink fondant teddy bear.  It was fun and very easy. The step-by-step instructions below may seem too long, but it just me posting so many pictures… so don’t be discouraged.  Before I begin, I would like to first say: don’t worry how your teddy bear is looking like as you make it, it all comes together at the end.
You will need:
1. Pink fondant for the teddy bear
2. A small amount of dark fondant for the scarf
3. A small amount of additional colored fondant for the silk rose (in this case orange) 
4. Black gel food color for eyes and nose
5. Any icing tip for mouth markings
6. A fondant baller
7. Piping gel (or food flavoring or vodka) to ‘glue’ fondant pieces
8. Decorating brush / Pearl dust brush (optional)
9. Wilton cutter / embosser
10. Like always, toothpicks (esential tools for cake decorating)
11. Read, “Working with Fondant” that I have previously posted.
 

I created this fun and colorful Tinkerbell cake for a baby shower in late November. The mom-to-be was a chocoholic, so I themed the flavor of this cake as “Death by Chocolate”.

The cake was … CLICK HERE for full post.

1. Roll fondant 1/16 in thick in desired color.

2. Cut 2 bow loops, 1 bow center and 2 streamers using a Fondant Cutter.

3. Cleck HERE for full post

How to Make a Cowboy Hat – Step-by-Step Instructions:

You’ll need:

gumpaste/fondant Mixture
– Small Cake (desired size of hat)
– Knive for carving
– Buttercream for frosting
Sewing wheel
Oval pans (optional)

Step-by-Step Instructions:

CLICK HERE for FULL Tutorial

How to Stack Cakes – without pillars
You’ll need:

Cake boardsfor each cake tier
– At least 3-4 dowel rods for each cake tier (except top tier)

Instructions:

CLICK HERE for FULL POST

How to Stack Cakes – With Pillars

There are many pillar sets out there.  Here is a quick link to Cake Pillars

CLICK HERE for FULL POST

I’m bringing this post to the top as I have added several tutorial links. My next flower should be the Victorian rose and the buttercream rose (worth the wait). I will be adding more flowers to this Index in the coming weeks. I hope you enjoy working with these flowers.

Please use this post as a flower name and step-by-step instructions reference:

Victorian roses

VICTORIAN ROSES

Daisies

DAISY 
Click HERE for Daisy flower step-by-step instructions.

Pansies

PANSY
Click HERE for Pansy flower step-by-step instructions.

Chrysanthemum

Chrysanthemum
Click HERE for Chrysanthemum flower step-by-step instructions.

Primrose

Primrose
Click HERE for Primrose flower step-by-step instructions.

Violet and violet leaf

Violet and Leaf 
Click HERE for Violet flower step-by-step instructions.
Click HERE for Violet leaf step-by-step instructions.

Daffodils

Daffodil
Click HERE for Daffodil flower step-by-step instructions.